
Vegetables
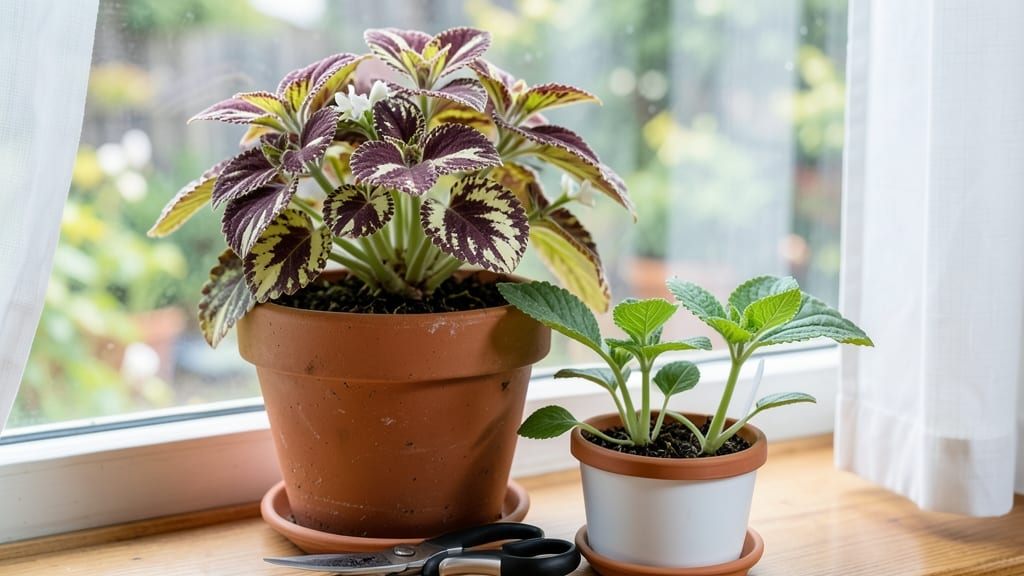
Your coleus plants are begging for a haircut—before winter kills their vibrant leaves. ✂️ I’ve saved mine every season by cutting back strategically, and the secret isn’t just trimming—it’s knowing when and how to do it without sacrificing next year’s color.
The right time is after your first frost, when foliage starts yellowing. Snip stems 3-4 inches above the soil, but leave a few healthy stems if overwintering indoors. Avoid shearing—clean cuts prevent disease, and the plant redirects energy to root growth instead of fading leaves.
By spring, you’ll have bushier plants with faster regrowth than store-bought starts. Just keep them in bright light and water when the top inch of soil dries. If overwintering outdoors in warm climates, mulch heavily to protect roots from freezing.
This method works for tender perennials too—just adjust timing based on your zone. Let’s get those coleus ready for another showstopping season!
📚 In This Guide
- What you need
- Instructions
- Tips and common mistakes
- Wrapping up and next steps
What you need
- ● Healthy coleus plants: Choose mature, non-flowering stems (at least 4-6 inches tall) with vibrant leaves.
- ● Sharp pruning shears or clean scissors: Sterilize with rubbing alcohol to prevent disease spread.
- ○ Small pots or containers: 4-6 inch pots with drainage holes (1 per cutting). Optional: Use recycled containers like yogurt cups with holes punched in the bottom.
- ● Well-draining potting mix: A blend of 50% peat moss or coco coir and 50% perlite or vermiculite (or a pre-mixed cactus/succulent mix).
- ○ Rooting hormone (optional but recommended): A gel or powder to boost root growth.
- ● Spray bottle with water: For gentle misting (avoid soaking the soil).
- ● Clear plastic bag or humidity dome: To create a mini greenhouse effect.
- ● Rubbing alcohol (70% or higher): For sterilizing tools.
- ● Newspaper or paper towels: To lay out cuttings for drying.
- ● Heat mat: Keeps cuttings warm (70-75°F) for faster rooting.
- ● Grow lights: Provides 12-16 hours of light daily if natural light is low.
- ● Labeling tags: To track cutting varieties (especially useful for mixed coleus collections).
- ● Fertilizer (diluted): A weak dose of seaweed extract or balanced liquid fertilizer (e.g., 5-5-5) after roots form.
- ● Humidity tray: A shallow tray filled with water and pebbles to maintain moisture.
Step-by-Step instructions for cutting coleus for winter
Here's how I prep my coleus for winter—no fancy tools, just sharp scissors and patience.
🌿 Step 1: Select Healthy Stems for Layering
Pick stems that are 4-6 inches long with at least 2-3 leaf pairs and no signs of yellowing or damage. I always choose the mid-height stems—they're strong enough to root but not too woody. Avoid the top growth, which is still growing and may not root as reliably.
Look for stems that bend easily but don't snap—this tells me they're flexible enough for layering. If a stem feels brittle, it won't root well. I also check the leaves: they should be vibrant, not faded or spotted. This ensures the cutting will have the energy to grow new roots.
✂️ Step 2: Make Clean Cuts and Prepare the Stem
Use sharp scissors or pruning shears to make a clean diagonal cut just below a leaf node (the bump where leaves attach). This increases the surface area for root growth. I dip the cut end in rooting hormone—it speeds things up and gives me better success rates, especially in cooler months.
Remove the bottom 1-2 pairs of leaves from the stem. These will rot in the soil before roots form. I leave the top leaves intact—they'll photosynthesize and feed the new roots. If the stem is too long, I can trim it later, but I want to keep it sturdy for now.
💧 Step 3: Layer the Stem in Moist Soil
Fill a small pot or tray with moistened potting mix (not soggy—it should hold together when squeezed but not drip). I make a small slit in the soil with my finger, about 1 inch deep, and gently tuck the cut end of the stem into the slit. The leaf node where the roots will form should be just below the soil surface.
Press the soil lightly around the stem to secure it, but don't pack it down too tightly. The goal is to keep the stem stable while allowing roots to grow outward. I water the soil gently until it's evenly moist—no puddles, just dampness. Too much water now will drown the cutting before roots form.
☀️ Step 4: Provide Warmth and Indirect Light
Place the layered stem in a spot with bright, indirect light—like a windowsill facing east or west. Avoid direct midday sun, which can scorch the leaves. I keep the soil consistently moist by misting it lightly every 2-3 days or when the top inch feels dry. Roots should form in 4-6 weeks.
If your home stays cooler than 65°F, consider using a seedling heat mat underneath the pot. Warmth speeds up rooting, and coleus roots best when soil temps hover around 70°F. Watch for new growth at the top of the stem—that's your sign roots are taking hold.
🪴 Step 5: Separate and Pot the New Plants
Once roots are 1-2 inches long (you can gently tug the stem to check for resistance), it's time to separate. I carefully lift the cutting from the soil, shake off excess dirt, and trim the rooted section from the parent plant. Plant it in its own 4-inch pot with fresh potting mix.
Water lightly after planting and place it back in bright, indirect light. Keep the soil moist but not soggy for the first 2 weeks to help the new plant establish. Once it's growing steadily, you can gradually introduce it to more sunlight. This method gives me 4-6 new coleus plants from a single mother plant!
Tips & tricks for perfect coleus layering
These little details make all the difference when propagating coleus—trust me, I've learned the hard way!
Stem Selection Matters: In Step 1, when choosing stems, look for ones that are slightly thicker than a pencil—they'll root faster and produce stronger plants. I've found that stems from the middle of the plant (not the very top or bottom) have the best balance of flexibility and strength for layering. Avoid stems with any signs of disease or insect damage, no matter how healthy they look otherwise.
Cutting Technique: For Step 2, that diagonal cut isn't just for looks—it actually increases the surface area for root growth by about 30%. Make sure your scissors are sharp; dull blades crush the stem instead of making a clean cut. After cutting, wipe off any sap that forms on the stem with a damp paper towel before dipping in rooting hormone. This helps the hormone adhere better and prevents bacterial growth.
Soil Moisture Balance: In Step 3, the soil should feel like a wrung-out sponge—not dripping wet, not bone dry. I like to test it by squeezing a handful: if water drips out, it's too wet; if it crumbles, it needs more moisture. Too much water causes rot, while too little prevents root formation. A spray bottle works great for keeping the soil consistently moist without overwatering.
Light and Temperature: For Step 4, if your home stays below 65°F, I recommend using a seedling heat mat—it can cut your rooting time in half. Place the pot on the mat and keep it plugged in 24/7. You'll notice new growth within 2-3 weeks instead of waiting for the full 4-6 weeks. Just be sure to remove the mat once roots form to prevent overheating the new plants.
Pro Tips for Cut Coleus For Winter
- These little details make all the difference when propagating coleus—trust me, I've learned the hard way!
- Stem Selection Matters: In Step 1, when choosing stems, look for ones that are slightly thicker than a pencil—they'll root faster and produce stronger plants.
- Cutting Technique: For Step 2, that diagonal cut isn't just for looks—it actually increases the surface area for root growth by about 30%.
Frequently asked questions
Got questions about prepping your coleus for winter?
You’re not alone! Here are answers to the most common concerns—so you can keep those vibrant leaves thriving all year.
When is the best time to cut coleus for winter propagation?
Cut coleus for propagation in early fall (September–October) when temperatures start to dip but before hard frosts hit. This gives stems enough time to root before dormancy. If you miss this window, you can still try in late winter (February), but growth may be slower.
Can I cut coleus too early or too late?
Yes! Cutting too early (summer) risks weak roots before winter, while waiting too late (after frost) can kill the plant. Aim for 6–8 weeks before your first frost—this balances root development and seasonal timing. If frost hits unexpectedly, bring cuttings indoors immediately to root in water or soil.
How do I know if my coleus cuttings are rooting successfully?
Healthy roots take 2–4 weeks to form. Check for tiny white bumps at the stem base (early roots) or gently tug the cutting—if resistance feels slight, roots are growing! Yellowing leaves or mushy stems mean rot; trim damaged areas and replant in fresh medium. Patience is key!
What’s the best way to overwinter cut coleus indoors?
Place rooted cuttings in bright, indirect light (e.g., a south-facing window) and keep soil lightly moist. Use a grow light if natural light is dim. Reduce watering in winter—overwatering causes root rot. A humidity tray or occasional misting helps mimic outdoor conditions.
Can I propagate coleus from winter-dormant plants?
Even dormant coleus can be revived. Take 4–6-inch cuttings from healthy stems (avoid woody or yellowed sections), dip in rooting hormone, and place in water or moist perlite. Keep in warmth (70–75°F) and watch for new growth in 3–6 weeks. Prune back dead foliage to encourage fresh shoots.
Wrapping up and next steps
Cutting your coleus for winter isn’t just about survival—it’s your chance to multiply your vibrant plants and keep the growing magic alive!
With the right tools, a little patience, and the layered propagation method, you’ll soon have lush new coleus ready to brighten your space next season. Now’s the perfect time to act: grab those shears, follow the steps, and watch your garden thrive year after year!
🌱 Next step: Share your progress with fellow plant lovers—tag us in your winter prep pics! Or dive deeper into coleus care tips for even more green success. Happy pruning! 🌿