
Watering
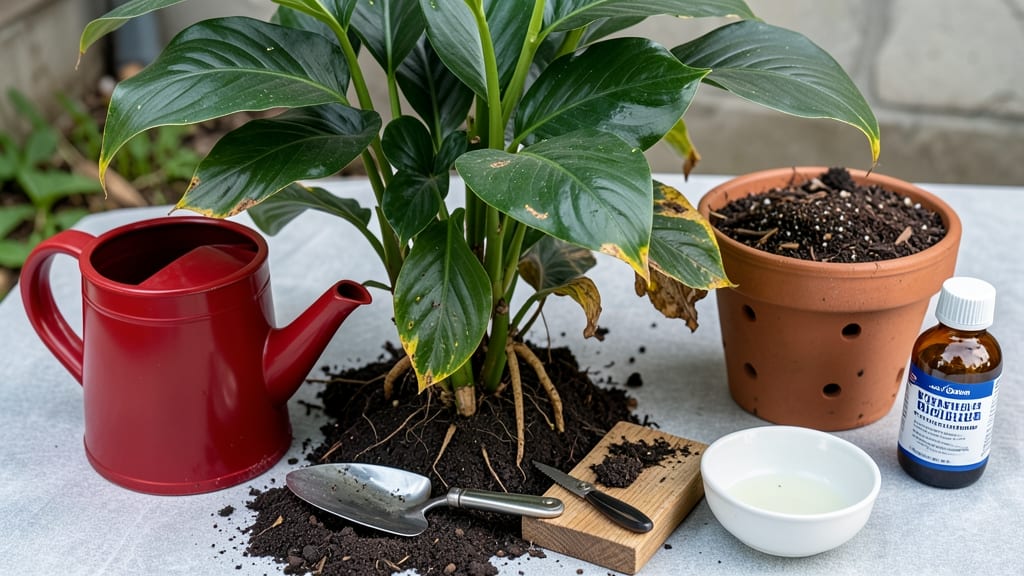
How to fix an overwatered peace lily—those drooping yellow leaves and mushy stems don’t mean it’s dead, just drowning. 💚 I’ve nursed back more overwatered peace lilies than I’d like to admit, and the secret is acting fast with the right steps. The good news? You can often revive them in just 3 days with proper care.
First, stop watering entirely and check the roots—if they’re brown and smelly, you’ve got root rot. Repot the plant in fresh, well-draining soil and trim away any mushy roots with clean scissors. Place it in bright, indirect light (no direct sun) and let the soil dry out completely between waterings.
Within 24-48 hours, you’ll see the leaves perk up as the roots recover. Keep the soil slightly moist but never soggy—stick your finger in first to test. A peace lily is tougher than it looks, and with this fix, it’ll bounce back stronger than ever.
Long-term, use pots with drainage holes and a mix of potting soil and perlite to prevent future issues. Your plant will thank you with glossy green leaves and those iconic white blooms. Trust me—this works!
Root Causes of Overwatering
Overwatering your peace lily (Spathiphyllum) might seem like a harmless mistake, but it can quickly turn into a serious problem—especially when roots drown and leaves turn yellow or mushy. Let’s break down the real reasons this happens, so you can avoid repeating them.
Peace lilies thrive in well-draining soil, but when their pots lack proper drainage, excess water pools at the bottom instead of escaping. Over time, this creates a waterlogged environment that suffocates roots.
- Why it happens: Most standard potting mixes retain moisture longer than needed, especially if they’re heavy or clay-based. Without drainage holes, water has nowhere to go. - Science behind it: Roots need oxygen to respire.
When submerged in water, they can’t absorb oxygen, leading to anaerobic conditions—which triggers root rot caused by fungi like Pythium or Phytophthora. - Actionable fix: Always use pots with drainage holes and a chunky, aerated mix (like a blend of peat, perlite, and orchid bark).
Peace lilies are tropical plants, but that doesn’t mean they love soggy soil. Many gardeners water on a strict schedule without checking soil moisture first.
- Why it happens: You might think, "More water = happier plant," but peace lilies are drought-tolerant once established.
Overwatering occurs when: - You water every few days (even if the topsoil is still damp). - You ignore seasonal changes (e.g., winter slows growth, so watering needs drop). - Science behind it: Excess water flushes out nutrients and disrupts the soil microbiome, which helps roots absorb water efficiently.
Over time, this weakens the plant’s defenses. - Actionable fix: Stick your finger 1-2 inches into the soil—if it’s damp, wait. In winter, reduce watering by 30-50%.
Some potting mixes are too dense, holding moisture like a sponge. If your peace lily’s soil is clay-heavy, peat-only, or lacks organic matter, it won’t dry out properly.
- Why it happens: - Cheap potting soil often contains too much peat or vermiculite, which traps water. - Repotting without amending soil can leave roots in a suffocating medium. - Science behind it: Compacted soil reduces porosity, meaning air and water can’t move freely.
Roots in waterlogged conditions suffocate, leading to root rot (a fungal infection that kills tissue). - Actionable fix: Repot with a fast-draining mix (e.g., 50% peat moss, 30% perlite, 20% orchid bark). Add worm castings for aeration.
Peace lilies love humidity, but too much moisture in the air (combined with poor airflow) creates the perfect storm for fungal growth.
- Why it happens: - High humidity + stagnant air = fungal spores thrive. - Misting too often can dampen leaves, trapping moisture at the base. - Science behind it: Fungi like Botrytis (gray mold) and Rhizoctonia (root rot) spread faster in wet, still air.
Overwatered soil + humid air = ideal conditions for rot. - Actionable fix: Use a humidifier (40-50% humidity) or place the plant on a pebble tray with water (but ensure the pot isn’t sitting in it). Improve airflow with a small fan.
Peace lilies grow slower in winter, but many people keep watering them the same way year-round.
- Why it happens: - Cooler temps = slower evaporation, so soil stays wet longer. - Less sunlight = less transpiration, meaning the plant doesn’t "drink" as much. - Science behind it: In winter, roots metabolize slower, and excess water washes away nutrients faster.
This weakens the plant’s immune system, making it more susceptible to rot. - Actionable fix: Reduce watering by half in winter and move the plant away from cold drafts.
Not all pots are created equal—some traps moisture while others breathe too much, but the wrong choice can still lead to overwatering.
- Why it happens: - Glazed or plastic pots don’t allow excess water to evaporate. - Terracotta pots dry out fast but can crack, leading to uneven moisture distribution. - Science behind it: Thermal mass (like thick ceramic) can keep soil cooler and wetter longer.
Meanwhile, plastic pots lack airflow, trapping humidity. - Actionable fix: Use unglazed pots with drainage holes (like ceramic or coconut fiber). For plastic pots, drill extra holes if needed.
💡 Pro Tip: If your peace lily’s leaves are yellowing with mushy stems, it’s a clear sign of overwatering. But if the yellowing is crispy or brown, it might be underwatering or salt buildup—so always check the soil first!
Revive Your Peace Lily Fast
Now that you know the signs and causes of overwatering, it’s time to take action! The good news? Peace lilies are resilient, and with the right steps, you can nurse them back to health—often in just 3 days or less.
Below, we’ll break down solutions tailored to the most common issues: yellow leaves, drooping foliage, and root rot. Follow these steps carefully, and your peace lily will bounce back like new.
Yellowing leaves are the first red flag, but they’re also the easiest to reverse if caught early.
Step 1: Stop Watering Immediately
🚰 Why? Overwatering stresses roots, preventing them from absorbing nutrients. Let the soil dry out completely before watering again. 💡 Pro Tip: Stick your finger 1-2 inches into the soil.
If it’s damp, wait 2-3 more days. If it’s soggy, hold off for a full week.
Step 2: Trim the Damaged Foliage
✂️ How to do it:
- Use sterilized scissors or pruning shears.
- Cut off only the yellow or brown leaves at the base where they meet the stem.
- Avoid cutting healthy green leaves—this helps the plant focus energy on recovery.
Step 3: Improve Drainage
🏗️ Quick fixes:
- Repot if needed: If the soil is compacted or lacks drainage, transfer your peace lily to a pot with drainage holes and fresh well-draining potting mix (like a blend of peat, perlite, and orchid bark).
- Add perlite or sand to existing soil to aerate it.
- Avoid saucers that trap water—empty them after watering.
Step 4: Water Correctly Moving Forward
💧 The right way:
- Water only when the top 1-2 inches of soil are dry (test with your finger!).
- Bottom-watering (placing the pot in a tray of water for 10-15 minutes) prevents over-saturation.
- Never let it sit in water—peace lilies hate soggy roots!
Drooping is usually a sign of root stress from overwatering or poor air circulation. Here’s how to perk it up:
Step 1: Check the Roots (Gently!)
👀 How to inspect:
- Remove the plant from its pot.
- Gently shake off excess soil to reveal the roots.
- Healthy roots are firm and white or light tan. Rotten roots are mushy, black, or smell foul.
Step 2: Prune Rotten Roots
✂️ If roots are rotting:
- Use sterilized scissors to cut away all black, mushy roots.
- Keep only the firm, white roots—they’ll regrow!
- Dip healthy roots in cinnamon or hydrogen peroxide (3%) for 10 minutes to prevent infection.
Step 3: Repot in Fresh Soil
🏺 Do this:
- Choose a clean pot (sterilize with rubbing alcohol if reusing).
- Use fresh, well-draining potting mix (avoid heavy garden soil).
- Plant at the same depth as before—burying the stem too deep can cause rot.
Step 4: Boost Recovery with Humidity
🌡️ Peace lilies love humidity!
- Place the pot on a pebble tray with water (not touching the pot).
- Mist the leaves lightly 2-3 times a week.
- Group plants together or use a humidifier if your home is dry.
If your peace lily has severe root rot, act fast to save it!
Step 1: Severe Root Rot?
Start Over 🔄 If >50% of roots are rotted: - Trim all roots down to healthy tissue (even if it means just a few small roots remain). - Soak the remaining roots in a fungicide (like copper fungicide or neem oil solution) for 10 minutes. - Repot in sterile, fresh soil—old soil may harbor fungi.
Step 2: Adjust Watering Habits Forever
💧 Prevent recurrence:
- Water every 7-10 days (or when soil is bone-dry).
- Use a moisture meter if you’re unsure—these gadgets take the guesswork out!
- Avoid ice cube watering—it can shock roots. Use room-temperature water instead.
Step 3: Give It Time to Heal
⏳ Be patient!
- Place the plant in bright, indirect light (no direct sun).
- Fertilize lightly (half-strength) only after 4-6 weeks of recovery.
- New growth should appear in 2-4 weeks if the roots are healthy.
Once your peace lily is back on track, follow these long-term care tips to avoid overwatering again:
✅ Use the right pot: Always choose containers with drainage holes—no exceptions! ✅ Check soil moisture: Before watering, press your finger into the soil. If it’s damp, wait. ✅ Water deeply but infrequently: When you water, soak the soil until water drains from the bottom.
Then, empty the saucer immediately. ✅ Adjust for seasons: Peace lilies need less water in winter (growth slows down). ✅ Monitor humidity: If your home is dry (especially in winter), increase humidity with a pebble tray or humidifier. ✅ Rotate the pot: Give your plant even light exposure by turning it occasionally.
| Issue | Fix It Fast | Prevent Next Time |
|---|---|---|
| Yellow leaves | Stop watering, trim leaves, improve drainage, water only when dry. | Use a moisture meter, repot if needed. |
| Drooping leaves | Check roots, prune rot, repot in fresh soil, boost humidity. | Bottom-water, avoid saucers. |
| Root rot | Trim all rotten roots, sterilize, repot in fresh soil, adjust watering. | Water every 7-10 days, use well-draining soil. |
With these steps, your peace lily should show signs of recovery within 3 days—think straighter leaves, new growth, and a happier plant! 🌿✨ Remember, prevention is key, so adjust your watering routine to keep your peace lily thriving for years.
Frequently asked questions about fixing an overwatered peace lily
How quickly can I see improvement after fixing an overwatered peace lily?
You’ll often notice changes within 24-48 hours—leaves will perk up and stand straighter as the roots recover. For severe cases with root rot, expect new growth in 2-4 weeks once you’ve trimmed affected roots and adjusted care. The key is consistency with proper drainage and watering habits.
Can I save a peace lily if most of its roots are rotted?
Yes, but you’ll need to act fast! Trim all black, mushy roots down to healthy tissue (even if it means just a few small roots remain), then repot in fresh, sterile soil. Soak the remaining roots in a fungicide like copper solution or neem oil for 10 minutes before replanting. With proper care, your peace lily can regrow roots in 4-6 weeks.
What’s the best soil mix to prevent future overwatering?
Use a chunky, aerated blend like 50% peat moss, 30% perlite, and 20% orchid bark. This mix improves drainage while retaining enough moisture. Avoid heavy garden soil or mixes with too much clay—these trap water and suffocate roots. Adding worm castings (10%) also boosts aeration and microbial activity.
Why does my peace lily still look sad after I stopped watering?
If leaves remain droopy or yellow even after adjusting water, check for root damage or nutrient deficiencies. Overwatering often flushes out nutrients, so fertilize lightly with a balanced houseplant fertilizer (half-strength) after 4-6 weeks of recovery. Also ensure it’s in bright, indirect light—low light slows recovery.
Can I use hydrogen peroxide to treat root rot?
Yes! A 3% hydrogen peroxide solution is excellent for sterilizing roots and preventing fungal spread. Soak the trimmed roots in the solution for 10 minutes before repotting. This kills pathogens while being safe for plants. Just avoid using it on healthy roots—it can be too harsh in high concentrations.