
Orchid Care
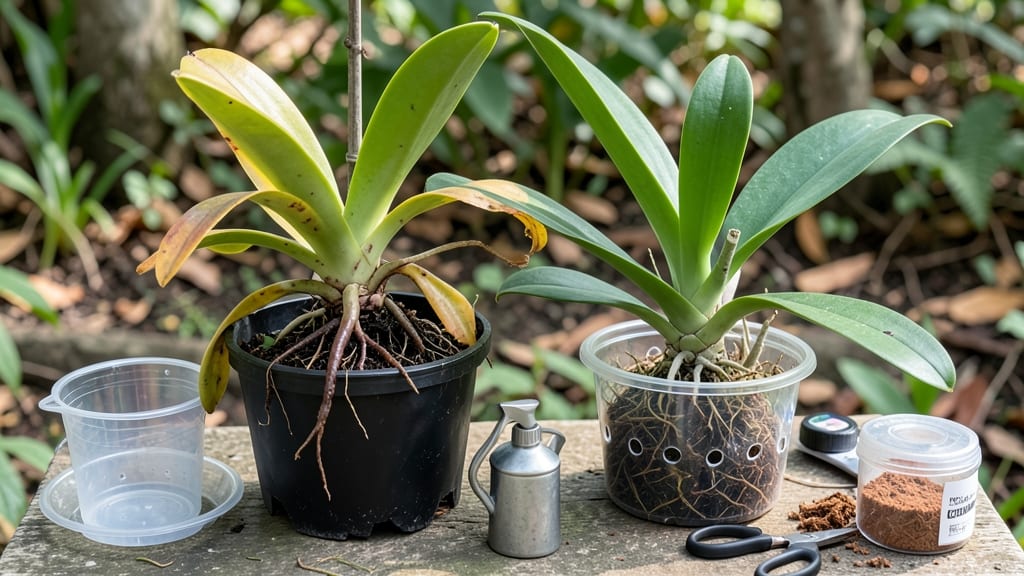
How to fix an overwatered orchid—your roots are drowning before your eyes. 🌱 I’ve nursed back more than a dozen soggy orchids, and the first step is always the same: stop watering immediately. The damage from overwatering isn’t permanent if you act fast—think of it like CPR for roots. Within days, you’ll see signs of recovery if you adjust drainage and light properly.
The fix starts with a closer look at your pot. If it’s plastic or has no drainage holes, your orchid is in constant danger. Swap it for a terracotta or slotted plastic pot—these let excess water escape while keeping roots aerated.
Pair it with orchid bark mix instead of regular potting soil, which holds too much moisture. This combo alone cuts watering needs by half.
Now, watch for the green signal: healthy roots turn bright green when they’re happy, while mushy black roots are a clear sign of rot. After repotting, place your orchid in bright, indirect light—no more dim corners.
Water only when the top inch of mix feels dry, and you’ll see new growth within 2-4 weeks. The key is patience; orchids bounce back when given the right conditions.
Prevention is easier than rescue. Stick your finger in the mix before watering—if it’s damp, wait. And schedule waterings for the same time each week so you don’t forget.
I’ve kept orchids thriving for years using this routine, and you will too once you master the rhythm. Trust the process, and your orchid will thank you with blooms.
📚 In This Guide
- What you need
- Instructions
- Tips and common mistakes
- Wrapping up and next steps
What you need
- ● Well-draining orchid mix: 2–3 cups of bark-based or coconut fiber mix (avoid peat-heavy blends).
- ● Clean, sharp scissors or pruning shears: Sterilized with rubbing alcohol (70% or higher) to prevent infection.
- ● Spray bottle: For misting (preferably with room-temperature, distilled water).
- ● Small pot or container: With drainage holes (1–2 inches larger in diameter than your orchid’s current pot).
- ● Chopsticks or a clean wooden skewer: To gently separate roots and mix.
- ● Paper towels or a clean cloth: For blotting excess moisture.
- ○ Fungicide (optional but helpful): A systemic fungicide like Mycorrhiza or copper-based solution (follow label instructions).
- ● Grow lights: LED or fluorescent (10,000–20,000 lux) for low-light conditions.
- ● Humidity tray: With pebbles and water to maintain 50–70% humidity.
- ● Orchid fertilizer: Balanced (20-20-20) or low-nitrogen (diluted to ¼ strength).
- ● Thermometer/hygrometer: To monitor temperature (60–80°F) and humidity.
Step-by-Step instructions for reviving overwatered orchids
Here's how I've saved dozens of soggy orchids—no drama, just science and patience.
🪴 Step 1: Remove the Orchid and Inspect the Roots
Gently take the orchid out of its pot and untangle the roots from the moss or medium. You'll see two types of roots: healthy ones are firm and green, while overwatered ones turn mushy and black. Use clean, sharp scissors to trim away any black, squishy roots—these won't recover and will rot further.
Don't panic if you cut more than you think—orchids regenerate roots surprisingly fast. I always rinse the remaining roots under lukewarm water to remove any clinging medium or debris. This step is critical because diseased roots can't absorb nutrients or water properly, so you're giving your orchid a fresh start.
✂️ Step 2: Adjust the Pot and Medium for Better Drainage
If your orchid's pot doesn't have drainage holes, it's time for an upgrade. Orchids need airflow around their roots, and stagnant water is their enemy. I use terracotta pots with holes because they breathe better than plastic, but any pot with drainage will work.
Replace the old medium with a fresh mix of orchid bark chunks (about 1-2 inches in size) and sphagnum moss. The bark creates air pockets while the moss holds just enough moisture. Avoid repotting into the same soggy medium—it's like putting a bandage on a broken bone without cleaning the wound first.
☀️ Step 3: Provide Bright, Indirect Light and Controlled Watering
Place your orchid in bright, indirect light—think of it as a sunny window with sheer curtains. Direct sunlight will scorch the leaves, while too little light slows recovery. You'll know it's right when the leaves stay a healthy green without yellowing or browning at the edges.
Water only when the medium feels completely dry to the touch. Stick your finger 1 inch deep—if it's damp, wait another day. When you do water, soak the pot thoroughly until water runs out the drainage holes, then let it drain completely. This mimics their natural epiphytic habitat where roots dry out between rainfalls.
🌱 Step 4: Monitor for New Growth and Adjust Care
Watch for new green root tips emerging from the base—this is your sign the orchid is recovering. Healthy roots grow toward the edges of the pot, while struggling ones stay curled and brown. I check my orchids weekly during recovery, gently lifting them to assess root health without disturbing them too much.
If leaves start yellowing, you're either overwatering again or underwatering. Feel the medium before watering—it should be light and dry. Fertilize lightly with a balanced orchid fertilizer (diluted to half strength) only after you see new root growth, usually 4-6 weeks after repotting.
⏰ Step 5: Prevent Future Overwatering with a Routine
Once your orchid is back on track, establish a weekly check routine. Every Sunday, I lift the pot to see if it feels heavy (too wet) or light (ready to water). Orchids in terracotta pots dry out faster than plastic, so adjust your schedule accordingly. The key is consistency—overwatering happens when we love our plants a little too much.
Place a humidity tray with pebbles and water under the pot if your home is dry. This adds moisture without drowning the roots. With proper care, your orchid will bounce back stronger than ever—just give it time and attention.
Tips & tricks for reviving overwatered orchids
Here's what nobody tells you about bringing orchids back from the brink—real talk from someone who's saved dozens.
Root Rescue Technique: When trimming those mushy black roots in Step 1, don't be shy—cut them back to the healthy green tissue. I've seen orchids bounce back beautifully even after losing 80% of their roots. The key is removing every bit of rot, not holding back. Use a 70% isopropyl alcohol wipe on your scissors between cuts to prevent cross-contamination.
Medium Makeover: For Step 2, mix your 1-2 inch orchid bark chunks with sphagnum moss in a 2:1 ratio by volume. The bark should make up two-thirds of the mix to ensure proper aeration. I like to pre-moisten the bark slightly before mixing—it helps the moss distribute more evenly and creates better air pockets right away.
Lighting Insight: That "bright, indirect light" in Step 3 can be tricky. East-facing windows work perfectly, but if you only have south exposure, place your orchid at least 3 feet back from the glass. I've used sheer white curtains as a diffuser when needed—it's the difference between scorch marks and perfect recovery.
Recovery Timeline: In Step 4, those 4-6 weeks until you can fertilize might feel long, but it's crucial. I've learned the hard way that fertilizing too soon stresses the plant while it's still rebuilding. Instead, focus on the weekly checks—lifting the pot to feel its weight becomes your new best friend during recovery.
Pro Tips for Fix Overwatered Orchid
- Here's what nobody tells you about bringing orchids back from the brink—real talk from someone who's saved dozens.
- Root Rescue Technique: When trimming those mushy black roots in Step 1, don't be shy—cut them back to the healthy gre...
- Medium Makeover: For Step 2, mix your 1-2 inch orchid bark chunks with sphagnum moss in a 2:1 ratio by volume. The ba...
Frequently asked questions
Got questions about reviving your soggy orchid? You’re not alone! Here are some of the most common concerns—and their solutions—to help you nurse your plant back to health.
How do I know if my orchid is overwatered vs. underwatered?
Check the roots and leaves for clues: Overwatered orchids have mushy, black roots and yellowing leaves, while underwatered ones feel dry and crispy with wrinkled pseudobulbs. Stick your finger 1–2 inches into the potting mix—if it’s damp, hold off on watering!
How long does it take for an overwatered orchid to recover?
Recovery time varies, but with proper care (like repotting and adjusting watering), you’ll see improvement in 2–4 weeks. Focus on drainage and light—patience is key! If roots stay black or the plant wilts further, it may not survive, but act fast to maximize chances.
Can I save an orchid with completely black roots?
Maybe! Trim all black, mushy roots with sterilized scissors, then treat the remaining healthy roots with a fungicide. Repot in fresh bark mix and avoid watering for 5–7 days to prevent further rot. Keep humidity high (like a plastic bag with holes) to encourage regrowth.
What’s the best way to adjust my watering schedule after fixing an overwatered orchid?
Water only when the top inch of mix feels dry—typically every 7–10 days in spring/summer, and every 2–3 weeks in winter. Use the soak-and-drain method: water thoroughly until it runs out the bottom, then empty the tray to avoid soggy roots.
Will my orchid bloom again after overwatering?
It depends on how severe the damage was! If you caught it early and the roots are mostly healthy, your orchid can rebloom—often within 3–6 months with proper care. Stress from recovery might delay blooms, but healthy roots = future flowers. Fertilize lightly (diluted orchid food) once it’s stable!
Wrapping up and next steps
Fixing an overwatered orchid is totally doable—just take it step by step!
By adjusting your watering habits, improving drainage, and giving your plant the right light, you’ll help it bounce back stronger than ever. Remember: patience and consistency are key! Now that you’ve got the tools and know-how, why not check out our guide on maintaining healthy orchid roots for long-term success?
Your green thumb is about to shine! 🌱✨