
Propagation
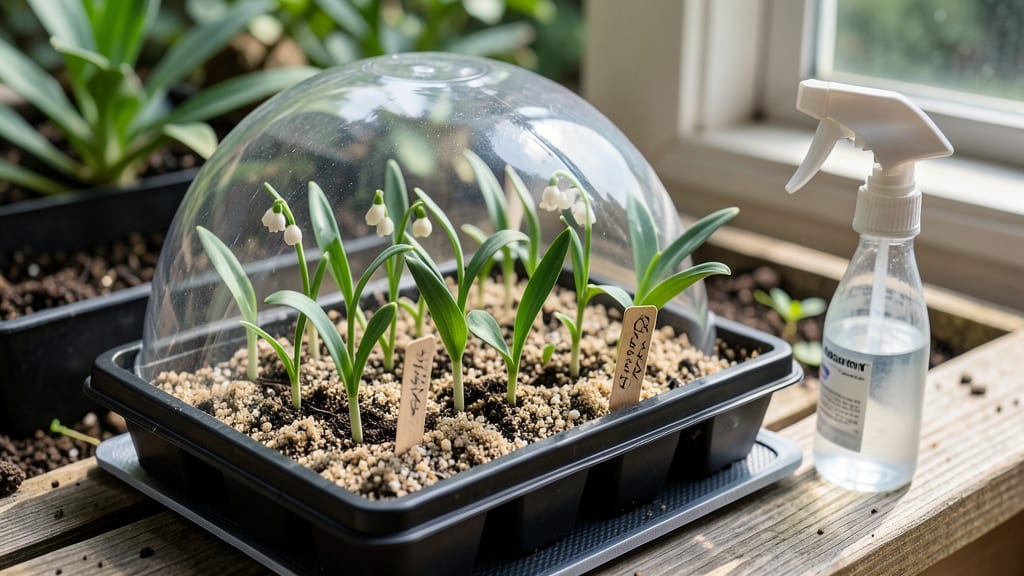
How to grow lily of the valley from seed is a year-long test of patience—but the first whiff of those bell-shaped blooms makes it worth it. 🌿 I’ve tried this stubborn plant three times, and only the third batch finally broke through. The secret isn’t forcing it; it’s setting the stage just right. This isn’t a quick project. Seeds need cold stratification (like winter in the ground) before they’ll even think about sprouting. Most gardeners give up here, but that’s where the magic happens—those tiny seeds, buried in damp soil for months, wake up stronger than nursery starts. Think of it as nature’s slow-motion reward. By year three, you’ll see delicate foliage pushing through, and by year five (yes, really), those signature fragrant clusters might finally appear. The payoff? A woodland garden staple that spreads reliably—and you grew it from scratch. No divisions, no shortcuts, just pure persistence. Fair warning: This isn’t for impatient gardeners. But if you’re willing to wait, you’ll end up with plants that outperform store-bought divisions. Let’s get those seeds in the ground the right way.
📚 In This Guide
- What you need
- Instructions
- Tips and common mistakes
- Wrapping up and next steps
What you need
- ● Lily of the Valley Seeds: Fresh, high-quality seeds (preferably from a reputable supplier; Convallaria majalis is the most common species). Note: Seeds lose viability quickly—use them within 2–3 months of harvest!
- ● Seed Starting Mix: A sterile, well-draining potting mix (look for a blend labeled for bulb/seeds or perennials). Avoid garden soil—it may harbor pathogens.
- ● Small Pots or Trays: 2–3 inch (5–7.5 cm) pots or a seed tray with drainage holes. Quantity: 1 pot per 2–3 seeds (crowding slows germination).
- ● Clear Plastic Dome or Plastic Wrap: To create a humid microclimate (essential for germination).
- ● Spray Bottle: With water (for gentle misting).
- ● Grow Lights or Sunny Windowsill: A south-facing window or LED grow lights (12–16 hours/day) for consistent warmth (65–75°F / 18–24°C).
- ● Patience! Germination can take 3–6 months—sometimes even longer.
- ○ Fine-Tip Tweezers: For delicate seed placement (optional but helpful!).
- ○ Heating Mat (Optional): A seedling heat mat (70–75°F / 21–24°C) can slightly speed up germination.
- ● Fertilizer (Diluted): A balanced liquid fertilizer (5-5-5 or 10-10-10) for seedlings—only after true leaves appear (dilute to ¼ strength).
- ● Humidity Tray: A shallow tray with pebbles and water to maintain moisture levels (great for stubborn seeds!).
- ● Labeling Tags: To track seed varieties and planting dates (trust us, you’ll forget!).
Step-by-step instructions for growing lily of the valley from seed
Here's how I coax these delicate blooms from tiny seeds—it takes time, but the fragrance is worth every wait.
🌱 Step 1: Stratify Seeds for Successful Germination
Lily of the valley seeds need a cold period to break dormancy. Place them in a sealed plastic bag with a damp paper towel, then refrigerate for 8-12 weeks. Check weekly—if the towel dries, mist it lightly. This mimics winter's chill, which signals seeds it's safe to sprout.
After stratification, remove seeds from the fridge and let them sit at room temperature for 2-3 days to equalize. Plant them ¼ inch deep in a well-draining mix of 50% peat moss and 50% perlite—this prevents rot while keeping moisture consistent. I use small pots or seed trays because these seeds are tiny and need space to grow without competition.
💧 Step 2: Provide Warmth and Humidity for Sprouting
Keep the soil consistently moist but not soggy—think of a wrung-out sponge. Place the tray in a warm spot (65-70°F) with indirect light. A seedling heat mat helps if your home runs cooler. Germination can take 4-12 weeks, so patience is key.
Cover the tray with clear plastic wrap to retain humidity, but remove it daily for 10 minutes to prevent mold. Once you see tiny green shoots, uncover completely. These seedlings are slow starters, so don’t disturb them—even a slight bump can stall growth. I label each pot with the date to track progress.
☀️ Step 3: Gradually Acclimate Seedlings to Light
After 4-6 weeks, when seedlings have 2-3 true leaves, move them to bright, indirect light. A north-facing window works best—direct sun can scorch their delicate leaves. If growth stalls or stems stretch (a sign of legginess), supplement with a grow light 6-8 inches above the plants for 12 hours daily.
Rotate the pots quarter-turn weekly so seedlings grow straight. At this stage, they’re still fragile, so water from the bottom by placing the tray in ½ inch of water for 10 minutes—this prevents soil disturbance and keeps roots moist without overwatering. Fertilize lightly with half-strength balanced fertilizer every 4 weeks to encourage sturdy growth.
🪴 Step 4: Transplant to Permanent Containers or Garden
Wait until seedlings are 4-6 inches tall and have 5-6 true leaves before transplanting. Choose shady to partially shaded spots—lily of the valley hates hot, dry conditions. In containers, use 6-inch pots with well-draining soil (equal parts garden soil, peat moss, and perlite). In gardens, space plants 6-8 inches apart in moist, humus-rich soil.
Transplant on a cool, overcast day to reduce stress. Water deeply after planting to settle the soil. Mulch with 2 inches of shredded bark to retain moisture and suppress weeds. These plants thrive in USDA Zones 3-8, but young seedlings need protection from harsh winters—cover with straw mulch in Zone 3 for the first year.
⏰ Step 5: Maintain for First-Year Growth and Bloom
Keep soil evenly moist but never waterlogged—lily of the valley roots rot easily. In spring and fall, fertilize with compost tea or slow-release fertilizer to build strength. Avoid high-nitrogen feeds, which encourage leafy growth at the expense of blooms. By year 3, you’ll see those iconic bell-shaped flowers, but some varieties may take 4-5 years to bloom—patience pays off with months of sweet fragrance.
Divide clumps every 3-4 years in early spring to rejuvenate growth. Dig up the entire plant, separate the roots, and replant the healthiest sections. Deadhead spent flowers to encourage more blooms, but leave some seed pods if you want to propagate more plants. These shade-loving perennials will naturalize over time, spreading gently to create fragrant colonies.
Tips & tricks for growing lily of the valley from seed
These subtle strategies will help you navigate the delicate journey from tiny seed to fragrant blooms.
Stratification Success: Don't rush the 8-12 week cold period—this is non-negotiable for breaking dormancy. I've seen seeds fail to germinate when people try to cut corners. Place your sealed bag on a shelf in your fridge's crisper drawer where temperatures stay consistently cold. If you're impatient, you can extend to 14 weeks but never skip this step entirely. The key is mimicking nature's winter chill perfectly.
Soil Mix Matters: The 50/50 peat moss and perlite blend is crucial for preventing rot while maintaining moisture. If you don't have peat moss, you can substitute with coconut coir, but add a handful of sand to improve drainage. Avoid garden soil—it compacts too easily and can suffocate tiny roots. I sift the mix through a fine mesh screen before planting to ensure it's fluffy and aerated.
Germination Patience: When you see those first tiny green shoots after the 4-12 week wait, resist the urge to peek daily. The 10-minute daily plastic wrap removal is your only disturbance—any more than that can shock the delicate seedlings. I set a phone reminder to check humidity levels rather than opening the tray. Remember, these seeds are slow starters, and rushing them often leads to failure.
Light Transition: The move from indirect light to bright indirect light after 4-6 weeks requires careful observation. If your seedlings develop long, spindly stems (called legginess), they're reaching for more light. This is your cue to either move them closer to your light source or increase grow light hours to 14 per day temporarily. I rotate my pots weekly to prevent any leaning toward one side.
Pro Tips for Grow Lily Of The Valley From Seed
- These subtle strategies will help you navigate the delicate journey from tiny seed to fragrant blooms.
- Stratification Success: Don't rush the 8-12 week cold period—this is non-negotiable for breaking dormancy.
- Soil Mix Matters: The 50/50 peat moss and perlite blend is crucial for preventing rot while maintaining moisture.
Frequently asked questions
Got questions about growing lily of the valley from seed?
You’re not alone—this fragrant beauty takes patience and precision! Here are answers to the most common queries to set you up for success.
Is it easier to grow lily of the valley from seed or division?
While seed propagation is possible, it’s far slower (3–5 years for blooms) and less reliable than divisions. Seeds require cold stratification, precise moisture, and patience—ideal for hobbyists, not instant gratification. For faster results, try dividing mature clumps instead!
How long does it take for lily of the valley seeds to germinate?
Germination can take 6–12 months—sometimes even longer! Seeds need a cold period (stratification) to break dormancy. Start indoors in fall, plant outdoors after last frost, and stay consistent with moisture. Don’t rush it; think of it as a long-term investment in fragrant blooms!
Why aren’t my lily of the valley seeds sprouting?
Common culprits:
- Lack of stratification: Seeds need 4–6 weeks in the fridge (or winter outdoors) to germinate.
- Poor moisture control: Keep soil evenly damp (not soggy) to avoid rot.
- Improper light: Bright, indirect light is key—direct sun can scorch tender seedlings.
- Old seeds: Fresh seeds (1–2 years old) germinate best.
Can I grow lily of the valley from seed in pots?
Yes! Use a well-draining pot (at least 6 inches deep) with a mix of potting soil and perlite. Keep it in partial shade and water consistently. Just know: Potted seedlings may need transplanting outdoors once established (they thrive in woodland conditions).
Will my homegrown lily of the valley bloom the first year?
Don’t hold your breath! Seed-grown plants typically won’t bloom until years 3–5. Focus on nurturing healthy foliage first. For quicker blooms, opt for divisions from an existing plant—they often flower within 1–2 years.
Are there any pests or diseases to watch for?
Keep an eye out for:
- Slugs/snails: Young seedlings are prime targets—use organic barriers or diatomaceous earth.
- Fungal issues: Overwatering causes rot; ensure good airflow.
- Deer/rabbits: Protect seedlings with netting if wildlife is a concern.
Wrapping up and next steps
Growing lily of the valley from seed is a rewarding journey that demands patience and care—but the fragrant results are worth every effort! 🌱 By following these steps—from selecting fresh seeds to nurturing seedlings and transplanting with precision—you’ll unlock the magic of these delicate blooms in your garden. Remember, consistency is key!
Once your seedlings are thriving, why not share the joy? Propagate a few more plants, gift them to fellow gardening enthusiasts, or even experiment with different growing conditions. Happy growing—your garden (and nose!) will thank you! 🌸