
Size
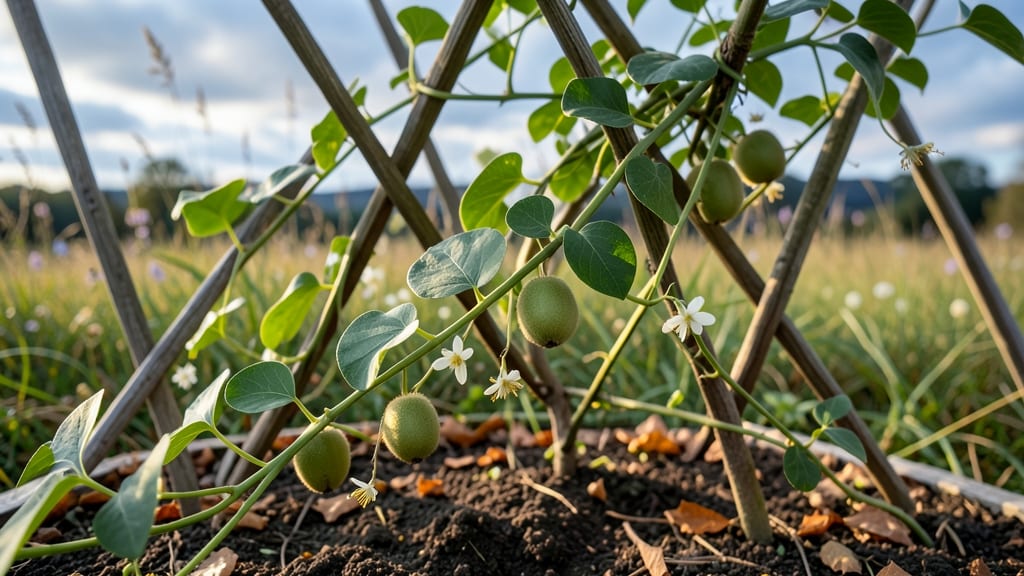
Fast-vining Arctic kiwi thrives where most vines fail—here’s how to grow it in containers or small spaces for sweet, fuzzy fruits. 🌱 I’ve grown these cold-hardy vines for years—no sprawling yard needed. The secret? Matching its nature with the right support, soil, and patience for those first edible harvests.
This vine isn’t fussy about soil, but it does demand good drainage and a sturdy trellis (think 10–12 feet tall). Plant in early spring or fall, spacing vines 6–8 feet apart if in-ground, or use 5-gallon containers for balconies.
Male and female plants must grow nearby for fruit, but don’t stress—pollen spreads easily between neighbors.
By year 3, you’ll snip pint-sized, grape-like kiwis bursting with tropical flavor. The vines climb aggressively, so prune in late winter to shape them and remove weak growth. A single plant can produce 5–10 pounds of fruit annually with proper care.
Perfect for small spaces, urban gardens, or even a sunny patio. Here’s how to skip the trial-and-error and get straight to harvests.
📚 In This Guide
- What you need
- Instructions
- Tips and common mistakes
- Wrapping up and next steps
What you need
- ● Arctic kiwi plant: 1-2 bare-root or potted plants (male and female, if pollination is desired). Choose disease-resistant varieties like 'Issai' (self-pollinating) or separate male/female plants for cross-pollination.
- ● Container: 1 large, durable pot (minimum 15-gallon capacity, 18"+ deep). Use fabric grow bags or plastic pots with drainage holes.
- ● High-quality potting mix: 1 bag (2-3 cubic feet) of well-draining, organic-rich soil (e.g., 60% potting soil + 30% compost + 10% perlite/pumice). Avoid garden soil—it compacts easily!
- ● Drainage materials: 1-2 inches of gravel, pebbles, or broken pottery for the pot’s base to prevent root rot.
- ● Support structure: 1 trellis, cage, or sturdy wire frame (6-8 feet tall) to guide vines. Use galvanized metal or UV-resistant plastic.
- ● Fertilizer: 1 balanced, slow-release fertilizer (10-10-10 or 5-5-5) or organic options like worm castings or fish emulsion.
- ● Mulch: 1-2 inches of organic mulch (straw, wood chips, or shredded bark) to retain moisture and regulate temperature.
- ● Pruning shears: Sharp, sterilized shears for trimming vines and shaping the plant.
- ● Gloves: Heavy-duty gardening gloves to protect hands from thorns.
- ● pH test kit: To check soil acidity (ideal range: 5.5–6.5). Adjust with lime or sulfur if needed.
- ● Drip irrigation or spray bottle: For consistent moisture, especially in containers.
- ● Plant ties or soft twine: To secure vines to the trellis gently.
- ● Winter protection: Burlap wraps or frost cloth for cold climates (<30°F).
Step-by-step instructions for growing Arctic kiwi in containers
Here’s how to coax those rapid vines into producing sweet, tart fruit—no sprawling garden required.
🌱 Step 1: Select the Right Container and Soil Mix
Arctic kiwi thrives in 5-gallon containers with drainage holes—larger pots delay fruiting, but smaller ones dry out too fast. I use fabric grow bags for their breathability, which mimics the well-draining conditions of their native rocky slopes. Fill with a mix of 60% premium potting soil, 30% perlite, and 10% compost to balance moisture retention and aeration.
Tap the container gently to settle the mix without compacting it. The goal is a fluffy medium where water drains freely but holds enough moisture for deep roots. Add a slow-release fertilizer (5-10-5 ratio) mixed into the top 2 inches—this gives the plant a nutrient boost without burning tender roots. I always label my containers with the variety and planting date, because Arctic kiwi’s rapid growth can make it easy to forget which plant is which.
🌿 Step 2: Plant and Train the Vine for Maximum Yield
Plant one male and one female Arctic kiwi (you’ll need both for fruit) in separate containers, spacing them 3 feet apart if growing side by side. The male’s pollen is essential—without it, female flowers won’t set fruit. Bury the bare-root plant up to the first set of leaves, then water deeply until moisture runs from the drainage holes.
Here’s the thing—Arctic kiwi vines grow 10-15 feet annually, so you’ll need a strong trellis or arbor right away. I use a 6-foot tall metal trellis with horizontal wires every 12 inches. Train the main stem vertically, tying it to the trellis with soft plant ties every 6 inches as it grows. This ensures the vine grows upward instead of sprawling, which maximizes fruit production and makes harvesting easier.
☀️ Step 3: Provide Full Sun and Consistent Moisture
Arctic kiwi demands 6-8 hours of direct sun daily—no compromise here. A south-facing window or grow light works for indoor starts, but outdoor containers need morning sun and afternoon shade in hot climates to prevent leaf scorch. You’ll know your plant is happy when the leaves stay deep green and slightly waxy, not yellow or crispy.
Water deeply every 2-3 days during the growing season, letting the top 2 inches of soil dry out between waterings. Overwatering causes root rot, while underwatering stresses the vine and reduces fruiting. Mulch the soil surface with 1 inch of straw to retain moisture and suppress weeds. In winter, reduce watering to once a week unless your climate stays mild.
✂️ Step 4: Prune for Fruit Production and Winter Hardiness
Pruning Arctic kiwi isn’t just about shaping—it’s about directing energy to fruit production. In late winter (before buds swell), cut back one-third of the oldest wood to encourage new growth. Remove any weak or crossing branches that rub together, as these create entry points for disease. You’ll see new shoots emerge from the base and along the main stem—these are where next year’s fruit will form.
After fruiting, trim back any dead or diseased branches immediately. In fall, reduce watering and stop fertilizing 6 weeks before your first frost. Arctic kiwi is cold-hardy to Zone 4, but young plants benefit from a light frost cloth during their first winter. The goal is to harden the vine without shocking it—gradual exposure builds resilience.
🍈 Step 5: Harvest and Overwinter for Next Year’s Crop
Arctic kiwi fruits ripen in late summer to fall, typically 90-120 days after flowering. You’ll know they’re ready when the skin turns bright yellow and the fruit detaches easily with a gentle twist. Harvest in the morning, when flavors are most concentrated. Store unwashed fruit in the fridge for up to 2 weeks—washing shortens shelf life by introducing moisture.
After harvest, reduce watering and stop fertilizing until spring. In colder climates, wrap the container in bubble wrap and move it to a garage or unheated shed where temperatures stay above 20°F. This protects the roots while allowing the vine to enter dormancy naturally. In spring, resume watering and fertilizing as new growth appears—your Arctic kiwi will reward you with faster, more vigorous vines the following season.
Tips & tricks for growing Arctic kiwi in containers
Fast growth doesn't mean you can skip the details—these tricks will help your Arctic kiwi thrive and fruit like a pro.
Container Selection: Fabric grow bags are my go-to because they prevent root circling and mimic the rocky, well-draining conditions Arctic kiwi loves in its native habitat. If you don't have fabric grow bags, look for containers with at least 4 drainage holes—this prevents the dreaded root rot that can kill your vine before it even flowers. I've seen people use plastic pots, but they trap too much moisture and can cause fungal issues over time.
Sunlight Strategy: The 6-8 hours of direct sun requirement is non-negotiable, but here's what I've learned about maximizing it: position your containers where they'll get morning sun and afternoon shade in hot climates. I've had plants in full afternoon sun wilt dramatically by evening—it's a clear sign of heat stress. For indoor growers, supplement with a full-spectrum LED grow light for 12-14 hours daily, especially in winter when daylight is shorter.
Trellis Training: Don't wait until the vine is already sprawling to set up your trellis! Install that 6-foot tall metal trellis with horizontal wires every 12 inches right when you plant. The key is to train the main stem vertically by tying it to the trellis every 6 inches as it grows. This vertical growth habit isn't just about aesthetics—it creates better air circulation around the plant, reducing disease risk and making fruit easier to harvest. I've seen vines grow 10-15 feet in a single season, so you'll need to be vigilant about keeping it supported.
Winter Protection: While Arctic kiwi is cold-hardy to Zone 4, young plants need special care during their first winter. Wrap containers in bubble wrap and move them to a location where temperatures stay above 20°F. I've had success using unheated garages or sheds, but avoid places with temperature swings—consistent cold is better than fluctuating conditions. The goal is to harden the vine gradually without shocking it, which can lead to winter dieback.
Pro Tips for Grow Arctic Kiwi
- Fast growth doesn't mean you can skip the details—these tricks will help your Arctic kiwi thrive and fruit like a pro.
- Container Selection: Fabric grow bags are my go-to because they prevent root circling and mimic the rocky, well-drain...
- Sunlight Strategy: The 6-8 hours of direct sun requirement is non-negotiable, but here's what I've learned about maxi...
Frequently asked questions
How long does it take for Arctic kiwi vines to produce fruit?
Arctic kiwi vines are fast—expect the first fruits in 2–3 years if you plant mature vines (1–2 years old). Young plants (from seed) may take 4–5 years. Patience pays off, but container growing can speed up maturity slightly with proper care!
Can Arctic kiwi survive cold winters in containers?
Yes! Arctic kiwi is hardy to USDA Zone 4 (as low as -30°F/-34°C), but containers need extra protection. Move pots to a sheltered spot (like a garage or against a south-facing wall) before temps drop below 20°F (-6°C). Mulch heavily and wrap vines in burlap for extra insulation.
What’s the best alternative if Arctic kiwi doesn’t thrive in my climate?
If your zone is too warm (Zone 9+), try hardy kiwi varieties like ‘Issai’ or ‘Ken’s Red’, which are self-pollinating and more heat-tolerant. For smaller spaces, grapevines or passionfruit (in frost-free areas) make great container-friendly alternatives!
Why are my Arctic kiwi leaves turning yellow or dropping?
Yellow leaves often signal overwatering or nutrient deficiency. Check soil moisture—containers dry out faster! Amend soil with compost annually, and ensure pots have drainage holes. Spider mites or aphids can also cause stress; spray vines with neem oil if pests appear.
Do Arctic kiwi vines need a trellis, or can they grow sprawling?
While Arctic kiwi can sprawl, a trellis or sturdy fence (6–10 ft tall) is ideal for container growth. It saves space, improves air circulation (reducing disease), and makes fruit harvesting easier. Use soft ties to avoid damaging vines as they grow!
How often should I fertilize Arctic kiwi in containers?
Feed monthly during spring/summer with a balanced fertilizer (10-10-10 or 5-5-5). In fall, switch to a low-nitrogen, high-phosphorus formula (like 5-10-10) to encourage root and fruit development. Pro tip: Reduce fertilizing in winter—vines rest!
Wrapping up and next steps
Growing Arctic kiwi in containers is totally doable—even for beginners! 🌱 With the right mix of patience, sunlight, and support, you’ll soon be harvesting sweet, tangy fruits from your own backyard (or balcony!). Remember: pruning, consistent care, and a little creativity with space-saving setups are your best friends.
Now that you’re armed with all the tips, why not start your Arctic kiwi journey today? Grab those vines, find your perfect container, and let nature work its magic. Happy growing—and enjoy those homegrown treats in just a few years! 🍈✨