
Container Gardens
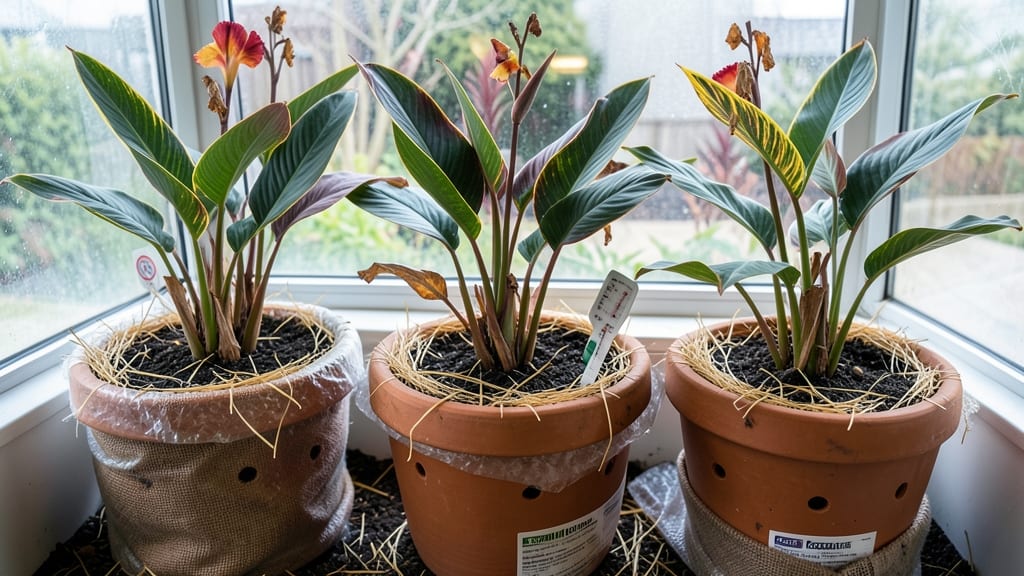
Overwintering cannas in pots without cutting feels like cheating winter. 🌱 I’ve saved my prized tropical plants for years using this method—no pruning, no stress, just a cozy setup that wakes them up ready for spring. The secret lies in insulating the pot and roots while keeping the foliage intact.
In milder climates (zones 8-10), a thick layer of straw mulch and a frost blanket works wonders. For colder zones (7 and below), move pots to an unheated garage or basement where temps stay 40-50°F. The goal? Protect roots while letting foliage stay dormant naturally.
By spring, you’ll see fresh shoots emerging from the base—no pruning needed. The plants come back stronger, with more blooms than ever, because we preserved their energy all winter. No more sad, leafless stalks or wasted effort. This method works for any container size and even saves space.
Just avoid freezing temps, and your cannas will thank you with bold, vibrant growth come spring. Let’s get those pots prepped!
📚 In This Guide
- What you need
- Instructions
- Tips and common mistakes
- Wrapping up and next steps
What you need
- ● Large containers or pots (1-2 per canna plant): Minimum 12-inch diameter (bigger is better for airflow and root space)
- ● Drainage holes required (or drill them yourself!)
- ● High-quality potting mix (10-15 lbs per pot): Well-draining, organic-rich mix (avoid garden soil—it compacts and holds too much moisture)
- ● Add perlite or vermiculite (1 part per 4 parts soil) for extra aeration
- ● Mulch or straw (2-3 inches): Shredded bark, leaves, or straw to insulate roots (avoid fresh grass clippings—they mat and rot)
- ● Watering can with a rose attachment (for gentle, deep watering)
- ○ Plant labels (optional but helpful for tracking varieties)
- ● Cold frame or mini greenhouse (if temps drop below 20°F/-7°C)
- ● Thermometer (to monitor soil temps—ideal range: 40-50°F/4-10°C)
- ● Fungicide spray (preventative measure for mold or rot)
- ● Plant saucers or trays (to catch runoff and protect surfaces)
Step-by-step instructions for overwintering cannas in pots without cutting
Here’s how to keep your cannas alive and thriving through winter—no pruning required.
🌱 Step 1: Prepare the Pots for Winter
Move your canna pots to a sheltered spot before the first frost. Choose a location that stays above 40°F—a garage, basement, or covered porch works well. If your pots lack drainage holes, drill a few extra to prevent root rot from excess moisture. I like to wrap the pots in bubble wrap or old towels to insulate them from cold drafts.
Water the plants lightly 2-3 days before moving—just enough to keep the soil slightly moist, not soggy. Overwatering now can lead to fungal issues once temperatures drop. If your cannas are still actively growing, reduce watering gradually to slow their metabolism before dormancy.
☀️ Step 2: Provide Indirect Light and Reduce Watering
Place the pots near a north-facing window or under a grow light for 4-6 hours of indirect light daily. Cannas don’t need full sun in winter, but they still need light to stay alive. If leaves start yellowing, it’s a sign of too little light—adjust their position closer to the window or increase grow light hours.
Cut back on watering dramatically. Let the top 1-2 inches of soil dry out completely between waterings. Overwatering is the #1 killer of overwintering cannas—roots need to stay dry but not bone-dry. Stick your finger in the soil; if it feels damp past your first knuckle, wait another day before watering.
⏰ Step 3: Monitor for Pests and Rot
Check the pots weekly for signs of pests like spider mites or mealybugs, which love dry winter air. Wipe leaves gently with a damp cloth if you spot any. If you see black, mushy spots on the stems or soil, it’s root rot—remove the plant immediately and repot in fresh, dry soil.
Here’s the thing—cannas naturally slow down in winter, so growth will stop. Don’t panic if the leaves turn brown or the stems shrink. This is normal! Just keep the soil barely moist and the environment stable. If mold appears on the soil surface, sprinkle a thin layer of dry sand to absorb excess moisture.
🌿 Step 4: Revive in Early Spring
When daytime temperatures consistently stay above 50°F, it’s time to wake your cannas. Move the pots back outside gradually, starting with 2-3 hours of morning sun per day. Increase sunlight exposure over 1-2 weeks to avoid shocking the plants. You’ll see new growth within 2-3 weeks—that’s your signal everything worked!
Once new shoots appear, resume regular watering and fertilize lightly with a balanced 10-10-10 mix. Prune only the dead or damaged foliage—never cut back healthy stems. Your cannas will bounce back faster without the stress of heavy pruning.
Tips & tricks for overwintering cannas in pots
Here’s what I’ve learned after keeping my cannas alive through multiple winters—these little details make all the difference.
Location Matters: That 40°F minimum is critical, but don’t just pick any spot above that temperature. I’ve found that garages with good airflow (but no drafts) work best—humidity builds up in completely enclosed spaces, which encourages mold. If your garage gets damp, add a small fan running for 30 minutes daily to keep air circulating.
The Light Factor: Those 4-6 hours of indirect light are non-negotiable, but here’s the trick: rotate your pots quarter-turn every week so all sides get even exposure. Cannas grow toward the light, and uneven exposure leads to lopsided regrowth in spring. If you notice leaves stretching toward the window, it’s time to move them closer.
Watering Wisdom: The 1-2 inch dry topsoil rule works, but I’ve learned to test deeper—stick your finger 2-3 inches down too. If that layer feels damp, hold off. I’ve lost plants because I only checked the surface. Think of it like a moisture gradient: the top can dry out faster than deeper layers, especially in cool winter air.
Spring Wake-Up: When temps hit 50°F consistently, don’t rush the 2-3 hour sun transition. I’ve seen plants shocked by too much sun too soon—leaves turn crispy within days. Start with morning sun only, then gradually add afternoon exposure over that 1-2 week period. Watch for new shoots first thing in the morning; that’s your real progress indicator, not just leaf color.
Pro Tips for Overwinter Cannas In Pots Without Cutting
- Here’s what I’ve learned after keeping my cannas alive through multiple winters—these little details make all the dif...
- Location Matters: That 40°F minimum is critical, but don’t just pick any spot above that temperature. I’ve found that...
- The Light Factor: Those 4-6 hours of indirect light are non-negotiable, but here’s the trick: rotate your pots quarte...
Frequently asked questions
Got questions about keeping your cannas thriving through winter without the fuss of cutting them back? You’re not alone! Here are some of the most common concerns—and straightforward answers to help you overwinter with confidence.
Can cannas survive winter in pots if I don’t cut them back?
Yes! Cannas are perennial in USDA Zones 8-11, and with proper care (like insulating pots and protecting from freezing temps), they can safely overwinter without pruning. The key is keeping the tubers dormant but alive—no need to stress over trimming unless the foliage is diseased.
When should I start preparing my potted cannas for winter?
Begin prepping in late fall (around October-November, depending on your climate). Stop fertilizing by early October, reduce watering, and move pots to a sheltered spot before the first frost. Early action prevents stress and rot.
What’s the best way to protect potted cannas from freezing temps?
Use a mix of insulation: Wrap pots in bubble wrap or burlap, top with straw or leaves, and place them in a garage, shed, or unheated basement (where temps stay above 30°F). Avoid freezing—canna tubers can’t handle it!
Will my cannas grow back in spring if I leave the foliage intact?
Leaving the foliage (unless diseased) helps the plant redirect energy to the tuber. In spring, you’ll see new growth before cutting back dead leaves. Just wait until late winter/early spring to trim—when you spot fresh shoots!
What if my canna leaves turn yellow or moldy before winter?
Yellowing leaves are normal as temps drop, but mold or rot means action’s needed. Prune only the affected parts, improve airflow, and reduce watering. If the tuber smells bad or is mushy, it’s likely too far gone—start fresh next year!
Wrapping up and next steps
Overwintering cannas in pots without cutting is totally doable—just follow these simple steps to protect your plants and keep them thriving! With the right insulation, moisture balance, and strategic placement, your cannas can brave the chill and return stronger next spring. 🌱❄️
Now that you’re armed with the know-how, give it a try this season! Start by prepping your pots and monitoring conditions early. If you’re new to overwintering, begin with just one or two plants to build confidence. Happy gardening—your future blooms will thank you! 🌸